
Month-end close is when you wrap up your accounting for the month. You are making sure everything is recorded, reconciled, and accurate before moving into the next month.
Every business runs month-end close in accounting differently and that is completely normal. Your industry, company size, and internal processes all shape how you close your books. Think of this guide as a starting point, not a strict rulebook. Take what works for you, adapt what doesn't, and build a month-end routine that fits your business.
Before you start your monthly closing procedure
Before starting, make sure you have all the information and records you need to review for the month. Most businesses close within 3-7 days after month-end. The key is consistency, not speed.
The 8-step accounting month-end close process
When using a monthly tax return periodicity, Odoo automatically generates a new tax return each month with both default and customizable steps to lead you through the month-end closing process from validating your records to submitting your return.
To begin, go to your Odoo application Accounting -> Accounting -> Tax Returns, open the monthly tax return, and verify all the checks.
It is always possible to override a check by clicking on its status and manually setting it to Reviewed or Supervised.
It is always possible to override a check by clicking on its status and manually setting it to Reviewed or Supervised.
1. Reconcile your bank transactions
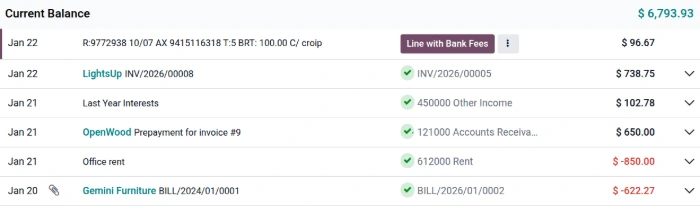
The first step in closing the month for your accounting is making sure your bank account is fully reconciled through the end of the month. Everything that’s cleared in your bank should be matched in Odoo.
Click the Bank Matching card to view any unreconciled transactions from the month in question
Reconcile each transaction with an invoice, bill, or payment, or write the transaction off to the correct account
Make sure your ending balance matches your bank statement for the month
Set up bank feeds for automatic imports and consider reconciling regularly, even weekly. That way, month-end is quick and stress-free.
Set up bank feeds for automatic imports and consider reconciling regularly, even weekly. That way, month-end is quick and stress-free.
2. Upload attachments to vendor bills
Attach PDFs or other file types to your vendor bills as supporting evidence in case of an audit.
Click the Bill Attachments card to view any bills that do not have documents attached
Open each bill in need of attachments and click the paperclip icon 📎 in the chatter to upload the attachment

3. Verify company data
Missing company details (like VAT number or country) can cause errors in your report, such as using the wrong VAT rate or wrongly exempting transactions.
Click the Company Data card to open your company record
Validate the company details and click Save
4. Confirm draft entries
Review and post draft invoices and bills in the period, or change their accounting date.
Click the Draft Entries card to view any draft entries
Verify everything delivered has been invoiced
Enter all vendor bills. Don't forget: rent, subscriptions, utilities, employee reimbursements, credit card purchases
Confirm any draft invoices and bills from this month or change their accounting date to the following month, if needed
Review aging reports for overdue payments (Accounting -> Reporting → Aged Receivable)
5. Verify taxes on invoices and bills
Ensure the taxes on invoices and bills match the customer’s country.
6. Review financial statements
Check your reports for accuracy.
Balance sheet (Accounting → Reporting → Balance Sheet): Verify account balances make sense
Profit and loss (Accounting → Reporting → Profit and Loss): Check categories and compare to last month
General ledger (Accounting → Reporting → General Ledger): Dig into strange balances
Aged receivables (Accounting → Reporting → Aged Receivable): See who owes you
Aged payables (Accounting → Reporting → Aged Payable): Check what bills are due
Red flags: Big swings from budget, negative assets, duplicate transactions, miscategorized expenses
7. Review tax report
Finalize your tax obligations for the period:
Click the tax report button above the tax return checks
Verify all sales tax and input tax are correct
8. Submit return
Once all checks have been either reviewed or supervised, the Submit button appears above the tax return checks. Clicking it displays the amount you owe or will receive as well as instructions on how to pay directly (depending on your fiscal localization).
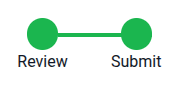
Click the Submit button
Pay and click Mark as Paid (if applicable) or click Send to send the payment details via email so that another person can make the appropriate payment.
Submitting a tax return automatically sets the Tax Return lock date, but the Sales, Purchases, and Everything lock dates can also be set manually via Accounting -> Accounting -> Lock Dates.
Wrapping up month-end
After finishing the month-end closing process, you will be ready to continue your day-to-day accounting processes for the following month, and you can analyze the accounting reports from the closed month to discover patterns and understand trends. Armed with this information, you not only will be able to submit your month-end close correctly, but you will also have a deeper understanding of your business and be better prepared for the future!
Odoo Accounting ~ Unmatched productivity: Odoo is a modern and the best accounting software for small business that provides unique features like Period closing, AI-powered invoice digitization, Multi-companies, complete Accounts Receivable and Payable, Smart account reconciliation tool, Analytic accounting, Assets, Expense & Revenue Recognition and fully integrated with modules like Sales, Inventory, Purchase, eCommerce, Manufacturing and more.